Whipped feta toasts

When I opened up the file I’d started writing for this recipe, it said this: “It’s possible that, like me, you’re feeling a wee bit tender-stomached and head pained due to a thoroughly good 4th of July celebration last night.”

Fourth of July, WHOA, that was a long time ago. It’s September now. I got married, I got honeymooned, I’m a married lady. The other friends of mine who got married this summer are also done and wedded ladies. My wedding season is over, and things are maybe, hopefully, fingers really crossed calming down? Enough for me to remember cooking and blogging and this little space.

I have this huge backlog of recipes. I want to share them with you! I really do, but I’m not sure how to get them all out on the page quickly. I think maybe I’ll need to have a recipe binge, in which you forgive me for not having deep and pithy things to say about each and every thing I post. It’ll mainly be summed up by “YUM.” Because I wouldn’t have put it in the queue if it wasn’t amazing, but I think maybe I went and used up all my pretty word allotment for 2013 in my wedding vows. Wedding vows, they really bring out your perfectionist tendencies.

Anyhoo. I want to get this backlog sorted out, especially because I just bought this little gem yesterday, and I am SO EXCITED to cook from it and maybe have some recipes to share with you.

So let’s get to it, shall we? Feta: Whipped? Toasts.

*IMG_2836

Whipped Feta Toasts

Presentation: If you’re planning on putting this on bread, you have two options: 1) arrange the tartines ahead of time for your guests and have someone set them out, or 2) set up a little station with bowls of whipped feta, slices of baguette, and delicious toppings. Personally, I like option 2, since it’s less work for you, your guests can make exactly the appetizers they want to eat, and people who don’t know a ton of other people at your event can strike up conversations while they’re putting together their food. And did I mention the less work part? I really like that part.

8 ounces feta
1-2 few tablespoons of olive oil
3 ounces cream cheese

Put the feta in a food processor, crumbling it a little if it’s not already crumbled.  Blend it until it’s turned into fine crumbs. Add a tablespoon of olive oil and blend until it’s mostly smooth, adding another tablespoon if needed.

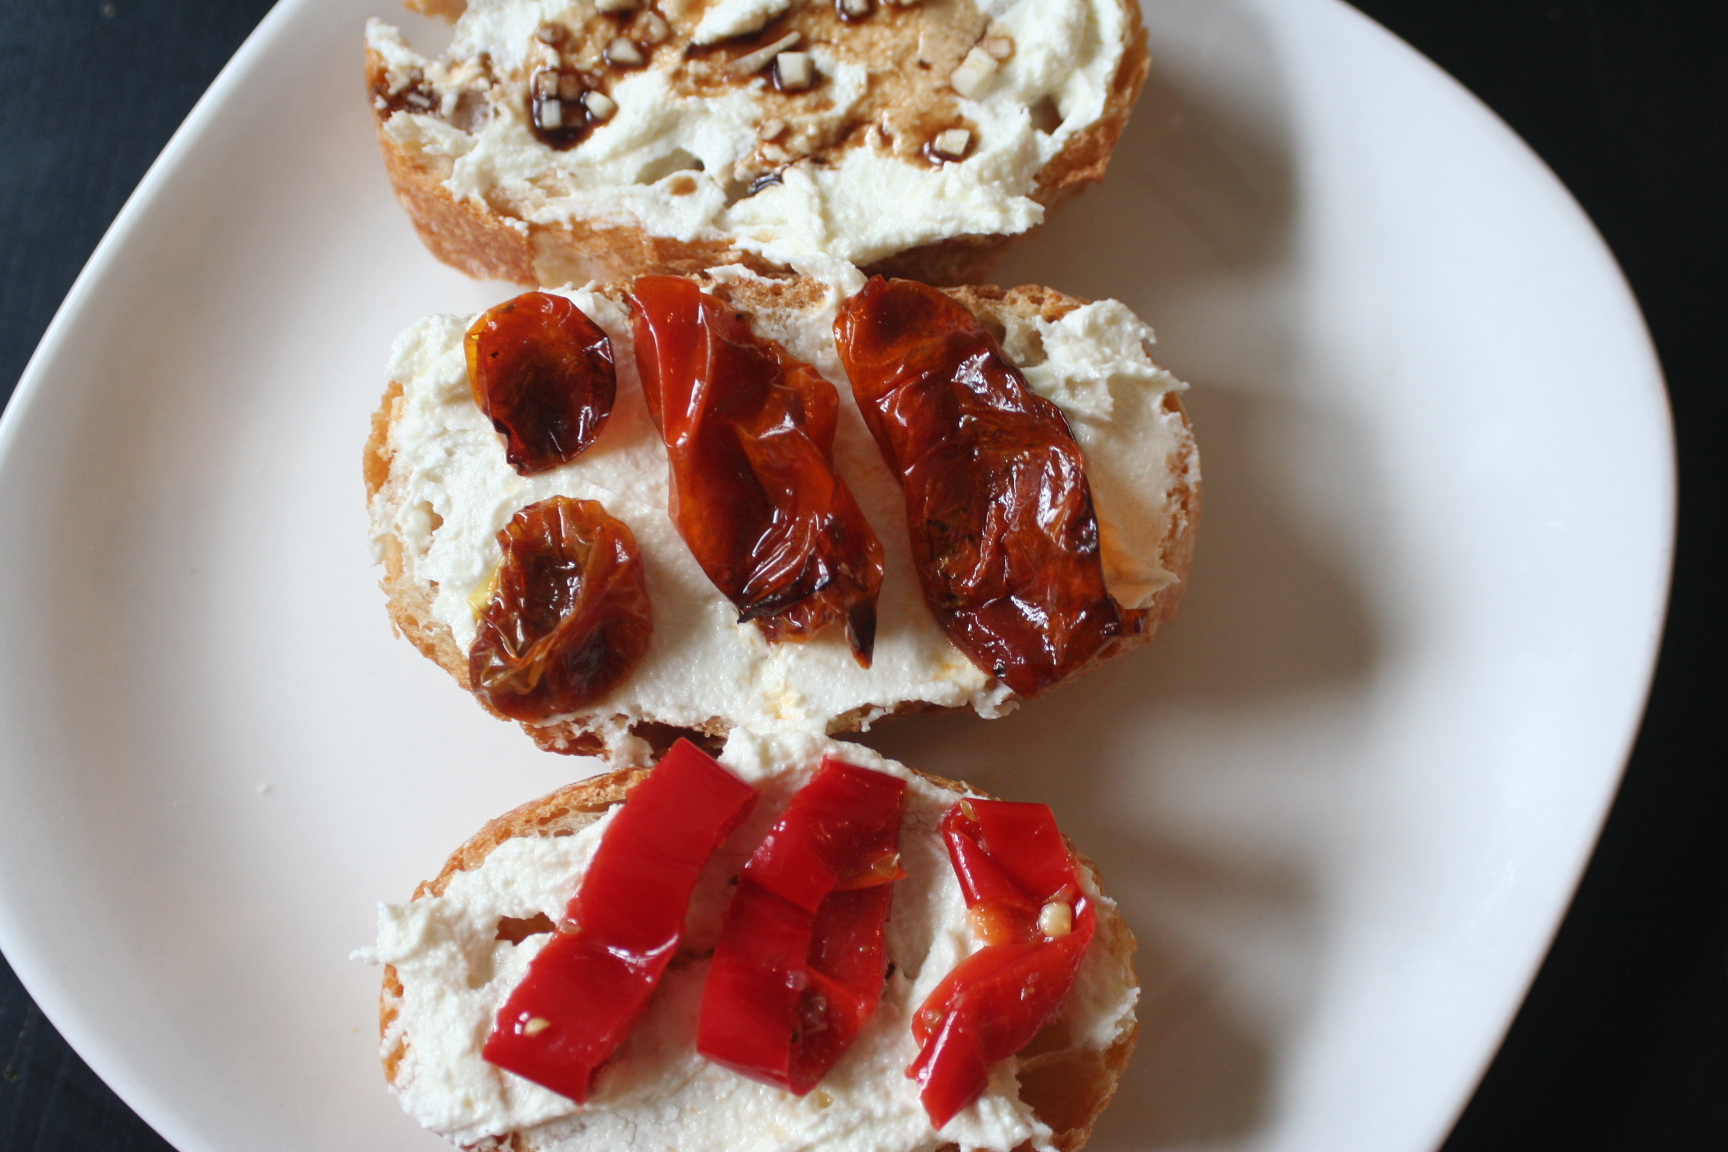
Add the cream cheese, and puree in the processor until it’s very smooth and creamy. Spread it on to slices of baguette and top it with delicious things.

To finish:
This makes enough whipped feta for about two baguettes, or one loaf of artisanal bread. Top with delicious things. Some potential combinations:

–       Mama Lil’s peppers and a balsamic reduction
–       roasted tomatoes, minced garlic, and drizzle of balsamic
–       roasted cherry tomatoes and a bit of olive tapenade
–       fresh or roasted figs and a drizzle of honey
–       red wine-pickled onions, a few baby salad greens, and chopped toasted walnuts
–       feta pairs well with dill, sage, and mint, so perhaps have salt cellars full of chopped herbs on hand, as well

*IMG_2859

Tagged , , , , , , ,

Cream cheese pound cake

Dessert celebration, round three! I knew I needed to make this cake as soon as I read the words “cream cheese” and “pound cake.” I was even more convinced after I read that they’re even better after they’ve been frozen, which seems like some sort of pound cake miracle. And really, no matter what I did to these cakes, they prevailed. Freezing, fridging, leaving them on the counter: they were still great. Also, they’re quick to put together, and the recipe makes a double batch. Dessert miracle, indeed.

Cream cheese pound cake (https://theselfcateredwedding.wordpress.com/)

Timing: Totally forgot to time myself with this one too, sorry! I think it was something like: 3 minutes for pan prep, 5 minutes for dry ingredient mixing, 15 minutes for the rest of the mixing, 3 minutes for getting it all into pans, 60 minutes for baking.

Scaling up: You could double this, I think, without the batter getting too unwieldy. (Keep in mind that each batch makes two loaves.)

Storage:
–       Refrigeration: This did well in my fridge for two days. Any longer than that and it started to dry out. (A note: the crust stayed crisper and tastier when I left it out at room temperature instead, but it was still good post-fridge.)
–       Freezing: I froze this after baking it, per the recipe’s original suggestion. As always, wrap it well in plastic wrap to make sure it doesn’t get freezer-burned. I just de-frosted it in the fridge for a few hours and then on the counter for another hour. I’m guessing you could freeze the batter and then bake it, but since you can bake it ahead of time, why bother?
–       Sitting out: This sat on my counter well for two days. I covered it in plastic wrap, but left a small corner open for air flow, so the texture didn’t get ruined. Any longer and you should freeze it so it doesn’t dry out.

Serving: This would, obviously, be great served with summer berries and/or whipped cream. (Whipped cream might be a little difficult to time for a large event.) If you really want to double-down on the cream cheese, you might serve it with an almond cream cheese frosting and fruit. Or mascarpone cream  or ricotta cream or even geranium cream (!). Or if you’re following the dreams of my 12-year-old self and having a chocolate fountain, you can cut the cake into nice little cubes and serve them on skewers for dipping.

cream cheese pound cake (https://theselfcateredwedding.wordpress.com)

Cream cheese pound cake
From this recipe.

3 cups all-purpose flour
1 teaspoon baking powder
½ teaspoon salt
1 cup (2 sticks/8 oz) butter, at room temperature
8 oz cream cheese, at room temperature
3 cups sugar
6 large eggs
1 teaspoon vanilla extract

Preheat oven to 325°F. Prepare two 9×5 loaf pans by putting in a piece of parchment paper, and buttering and flouring the remaining two exposed sides. (You can also 10-inch bundt pan, although that will be harder to use with parchment paper, and thus potentially harder to remove while keeping it pretty.)

Whisk together the flour, baking powder, and salt in a medium bowl.

Using a stand mixer or a hand mixer, beat together the butter and cream cheese until it’s fluffy. Add the sugar, and continue to beat it for another two minutes. Mix in the eggs, beating the mixture after each one until it’s well-combined. Add the vanilla.

Lower the mixer speed. Add in the flour mixture a third at a time, mixing after each addition until it’s just combined, making sure to scrape down the sides as you go.

Divide the batter between your two loaf pans (or put it all in the bundt). Bake for 55-60 minutes for loafs and 75 minutes or so for a bundt, until a toothpick inserted in the middle comes out clean. (My loaves took about 7 minutes longer.) Cool the cakes completely before removing them from their pans. Use a thin knife to loosen the sides if they won’t come out easily.

Tagged , , , , , , ,

S’mores blondies

Round two of dessert celebration! I actually posted these on my other blog last year, when I first came up with the recipe, but they’re amazing enough that I thought they were worth sharing here.

Brown butter s'mores blondies (https://theselfcateredwedding.wordpress.com/)

Scaling up: You could easily quadruple the recipe for two large pans of blondies. Any more than that and you’ll probably want to make multiple batches.

Timing: I forgot to time my prep for these, sorry! From memory, I think it was approximately: Pan prep took 3 minutes. Browning butter took around 7 minutes, and then I let it cool for 10. Mixing everything together and putting it in the pan took around 15 minutes.

Storage:
–       Refrigeration: These kept in my fridge for two days. I wouldn’t go longer for fear they’ll dry out.
–       Freezing: I froze these two ways: 1) totally cooked, with marshmallows on top, and 2) just the batter, without the marshmallows. Both methods worked well, although the second method was noticeably better (marshmallow was a littllllle less fluffy after having been frozen). So if you have the time, freeze the batter without the marshmallows on top. To bake, add the marshmallows and bake straight from the freezer. Mine didn’t take any longer to bake than the non-frozen version, but I think that might have been a fluke.
–       Sitting out: These can sit out for a day or even two (covered with plastic wrap) with no adverse effects. Any longer and they’ll probably dry out.

Salted brown butter s’mores blondies
½ cup (1 stick) butter
1 cup packed brown sugar
1 large egg
1 teaspoon vanilla
2 teaspoons kosher salt (more like 1 teaspoon if you’re using table salt)
1 cup flour
½ toasted pecans
½ cup chocolate chips
10-15 large marshmallows

Preheat oven to 350°F. Butter and flour an 8×8 pan.

Brown the butter (instructions here). Let it cool.

Mix together browned butter and brown sugar. Beat in the egg, and then the vanilla. Mix in salt, then flour. The mixture will be thick. Stir in pecans and chocolate chips.

Pour the mixture into the prepared pan.

Bake for 10 minutes. Remove from oven, and place one marshmallow on every square inch or so. Place back in oven, and bake for another 10-15 minutes, until it’s set in the middle (the marshmallows might make it a little hard to tell, but don’t worry about them being slightly underbaked, they’re gooey and delicious that way). The marshmallows will puff out and melt back over the top of the blondie.

A note: It will seem tempting to cut into them hot. They’re ok that way, ignoring the burning-hot marshmallow, but unlike most brownies, they’re at their most extraordinary after they’ve cooled.

Tagged , , , , , , , , , , ,

Yay/eek

By the time Lee and I get back from England, there will be less than two months until the wedding. There are two options: 1) freak out, or 2) celebrate. We also just officially crossed the mark of having all the major things figured out. As of right now, we could have wedding with no table runners and lumps of flowers just dropped on the table, but with food for people to eat and plates for them to eat it off of, and someone to marry us and music for people to dance to.

So I think I’ll pick 2) celebrate! over 1) burst into frantic, hysterical tears. Yes? Yes. And what is a celebration without dessert? Rhetorical question, every celebration needs dessert, duh.

I have three recipes for you over the next few days, for freezable, wedding-worthy desserts. Today, we’re exploring salted caramel brownies. Salted? Caramel? Brownies? Yes.

IMG_2741

A note: don’t overbake these. The gooeyness is essential to the flavor as well as the texture, and if you bake them too long, the caramel starts to disappear into the brownie.

Timing:
Making the caramel took 15 minutes. Melting chocolate and butter took 13 minutes. Stirring in the rest of the ingredients and arranging everything in pans took another 10. Baking took 25-35 minutes.

Storage:
–       Refrigeration: Go on and stick them in the fridge. I wouldn’t do more than a day or two, though, so that they don’t dry out. Make sure to pull them out at least an hour or two before you serve them, so they’re not hard.
–       Freezing: You can put the batter into pans, freeze them, and then bake them straight from the freezer. Mine took an extra five minutes of baking time, for a total of 35 minutes, but watch yours closely. Like I point out above, you want them gooey and almost a little underbaked.
–       Sitting out: You’re good to go. I left mine out overnight and they were fine.
–       Prep: You can definitely make the caramel ahead of time, and leave it in the fridge for several days.

IMG_2732

Salted Caramel Brownies
From Deb Perelman’s fantastically creative brain and blog.

For caramel:
1/2 cup granulated sugar
4 tablespoons butter (salted or unsalted)
Heaping 1/4 teaspoon flaky sea salt (or 1/8 teaspoon table salt, more to taste)
3 tablespoons heavy cream

Put some parchment paper on a large plate. If you’re feeling thorough, butter it. If you’re feeling lazy, like I was, don’t bother.

Get a medium saucepan. Make sure it is totally dry. Melt the sugar, which will take about five minutes. You’ll probably need to stir it a few times as chunks form. (A note: use a fine-grained sugar. The natural sugar I used the first time was so course it almost looked like demerara, and it made it really hard for it to dissolve evenly.) (Another note: hot sugar is hot. Don’t be like me, remember not to touch it.) It will probably be a coppery, caramel-y color by this point. If it’s not, cook it for a few more minutes, but keep an eye on it and don’t let it get too dark. You want it to be basically exactly the color of packaged caramel candies from the store (see picture below).

Remove it from the heat, and stir in the butter. It probably won’t incorporate entirely into the sugar. Don’t worry about that, but do stir it well. Stir in the cream and the salt, and it should start to come together. Put the pan back on the heat and bring it to a simmer, and cook it until it has all incorporated. Remove it from the heat again, and pour the mixture onto the parchment papered plate. Put it in the freezer until it’s solid enough to cut, around half an hour.

When it is firm, use a sharp knife to cut it into approximately 1-inch squares.

IMG_2601

For brownies:
3 ounces unsweetened chocolate, roughly chopped (I actually messed up and used sweetened chocolate the first time I made these. I still liked them. I maybe even liked them more than the normal ones.)
1 stick (8 tablespoons) unsalted butter, plus extra for pan
1 cup granulated sugar
2 large eggs
1 teaspoon vanilla extract
Heaping 1/4 teaspoon flaky sea salt
2/3 cup (85 grams) all-purpose flour

Preheat your oven to 350°F. Line an 8×8 inch square baking pan with parchment paper, butter and flour the two remaining exposed sides.

Make a double boiler by putting a heat-proof glass bowl over a pan full of water. Bring the water to a simmer, and melt the butter and chocolate in the bowl, until smooth. Stir it regularly, and don’t overheat/don’t burn the chocolate.

Remove from heat. Whisk in the sugar, and then the eggs, one at a time, then the vanilla and the salt. Stir in the flour.

Fold most of the caramel squares into the batter, reserving a small handful. Transfer the batter to the prepared pan, smooth it out, and sprinkle the remaining caramels on top. (If you’re freezing, cover with plastic wrap and transfer to the freezer.)

Bake for 30 minutes, until an inserted toothpick comes out clean. (That is, clean from brownie crumbs. It will almost certainly have some caramel on it.) Brownies will cut better (and not burn your mouth with hot caramel!) if you let them cool first.

Tagged , , , , , , , ,

Spring vegetable dip with chevre and asparagus

Hello from England! I’m sitting here in a coffee shop looking out at centuries-old buildings, drinking what might be the only decent latte in all of Oxfordshire, sitting next to a man who looks just like Slavoj Žižek. Lee just marched off in her fancy dress and Harry Potter cape to take a final exam.

(Speaking of this coffeeshop, can we talk about the fact that when I’m not in Portland, I find the most Portland place possible? In the middle of Oxford, the baristas here are all tattooed and thrift shop chic and playing Jay-Z. We were in Amsterdam last week, and we were wandering a lot. When Lee was leading, we ended up at a synagogue and a convenience store full of butch lesbians. When I was leading, we ended up in a square with an artisanal chocolate shop and a coffee shop with twelve types of pour-overs. I’m hopeless.)

England’s about a month behind Oregon, so when I left, our lilacs were dried and brown, and the summer heat was starting to show off what it can do. But here, it’s still a little chilly, and there’s asparagus! Asparagus! I’ve become a little obsessed with wild asparagus (blame this picture), and yesterday’s late night wikipedia-ing led me to the information that Germany’s asparagus season goes until June 24th(!) So that’s my excuse for posting a recipe that might be a little out of season for most of you. I’m in Europe! Things are different here!

IMG_3125 

Continue reading

Tagged , , , , , , , , , ,

Roasting, renewed

I remember a time when roasted vegetables seemed revolutionary to me. Vegetable, fat, hot hot heat -> delicious, easy, slightly caramelized edges. What a trick, to have something so amazing from so little effort. At this point, kale chips were all the rage across food blogs, so I think maybe other people shared my wonder at the power of roasting.

These days, as an audience, we’re a little bit more picky. Roasted produce is great for weeknight dinners, but we’ve shaken the magic off of them. The illusion has been revealed. But that bugs me, because there’s still so much potential there, for a dish that’s easy and cheap, but tastes complicated and expensive, which is the holy grail of self-catered weddings as far as I’m concerned.

Roasted cauliflower with garlic, olives, and harissa cream. https://theselfcateredwedding.wordpress.com/ Continue reading

Tagged , , , , , , , , , , , ,

Grapefruit and Aperol

I’m a bit writer’s blocked today. I think it might be the cocktail I want to tell you about. It’s like when I’m trying to write a cover letter for a job I really, really want, and instead of having anything productive to say, I just want to type “I LOVE YOU PLEASE HIRE ME I’M GREAT I PROMISE” and send that in.

So it’s a little like that, but in this scenario, this drink is the job, and you’re the interviewer. (It could get worse than peddling craft cocktails.) For a wedding, yes, this cocktail is a bit of a hard sell. You need good-quality grapefruit juice, so you might need two things: 1) a juicer and 2) for grapefruits to be in season. The good news: you could probably make this with a tasty juice from the store (maybe this). And grapefruit juice freezes beautifully. And it’s so good that I promise you, juicing 60 grapefruits will only make you feel a little full of rage. Which the cocktail sampling will make up for.

MAKE THIS COCKTAIL AND DRINK IT IT’S WONDERFUL I PROMISE

Pamplemousse cocktail @ https://theselfcateredwedding.wordpress.com/

Continue reading

Tagged , , , , , , , , ,

Summer squash and ricotta tarts

This blog came about because I’m going to be testing out some recipes for my own wedding, this August, and I figured, why not post some of those here, for other people to benefit from, as well?

I’m trying out a variety of techniques, to see how foods stand up to various indignities, such as being frozen, refrigerated, and left out at room temperature for a while. I don’t have all the results yet, but I’ll be checking back in on my frozen foods in a few weeks, and I’ll update then.

First up are ricotta and summer squash tarts. These are really good. Like really, really good.

summer squash and ricotta tarts @ https://theselfcateredwedding.wordpress.com/ Continue reading

Tagged , , , , , , , , , ,

Let’s Talk About Cake

Let’s talk about cake. (When is it not a good time to talk about cake?)

The Wedding Cake by Flickr user Sean Davis

Photo © Flickr user Sean Davis

Continue reading

Tagged , , , , ,

The Self-Catered Wedding

theselfcateredwedding.wordpress.com/

Photo © Flickr user Ismar Badzic

Fact of life: you can find basically anything on the internet. So when I search for something and few results come up, I feel this hipster frisson of delight: I am the very first person who thought of this.

When I googled “self catering your wedding” and nothing came up, though, I felt something that was more like a tingle of frustration. Ok, more like fear. I cried. A lot. (I find that wedding planning brings on a lot of tears.) It probably had something to do with the fact that we’d recently talked to several caterers who had quoted us around $13,000 for 80 people. I respect that this is their business and they need to make a living and that high-quality food is pricey, but damn we do not have that much money to throw at a single meal, even if it is a meal for the people we love most in this world.

Continue reading

Tagged , ,